Thursday, June 26, 2014

Chocolate Teddy Graham and Marshmallow Ice Cream


The gift that keeps on giving... is what my ice cream maker is. My husband was smart when he purchased this for me for Mother's Day. We make a new batch almost every week. Good thing we're training for a marathon, otherwise, we couldn't afford the extra calories. Get ready for lots of ice cream varieties. Your kids will love you for making this flavor. It tastes just like an ice cream sandwich. Summer's favorite treat. Put some sprinkles on top and they will be over the moon.  :)

Chocolate Teddy Graham Marshmallow Ice Cream

Makes about a quart

Ingredients

1 can sweetened condensed milk, refrigerated about an hour
1 cup heavy cream
1 cup whole milk
1 teaspoon vanilla extract 
1 cup chocolate Teddy Grahams 
1 cup mini marshmallows or diced large marshmallows (easiest diced when frozen)

Directions

Place an empty 9x9 glass baking dish in the freezer. 
Place Teddy Grahams, and marshmallows in the freezer.
Whisk together both milks, cream, and vanilla.
Freeze according to your ice cream freezer instructions. 
Add the marshmallows and Teddy Grahams just before or right about when it's done. 
Transfer to the glass baking dish and place in freezer until you're ready to eat it. A few hours is best but you can eat it right away too, it will just be a little melted (melts fast). 


Monday, June 23, 2014

Chocolate Chip Cookies with Brown Butter


I use a lot of America's Test Kitchen recipes and I wish I used more. These are the only chocolate chip cookies I've made for years now. I probably should try a different kind every now and again but ATK hit the nail on the head, for me, with these. I can still remember the first cookie I had. 

My husband and I headed out to Hale Center Theater with another couple. My Mom handed us a bag of cookies as a snack to share and sneak in :). Well, we were only able to get seats of 2 together so we split up. Later, we met in the hall during intermission and asked eachother if they had tried the cookies because they were goooood. Haha thanks, Mom! 

I usually double the recipe and only cook one dozen. Then I scoop the remaining dough in large tablespoon portions on a pan and freeze them. Then after they've froze, pour them into a plastic freezer bag  and save them for later. I then cook half dozen portions each time I want fresh cookies. I can't really tell you how long they last this ways because I don't think I've left them in the freezer for longer than a month or two. Nomnomnom :) I bake them at the same temperature with the same amount of time. Maybe add a minute or two. Just watch them if you do it this way. 

Chocolate Chip Cookies with Brown Butter (America's Test Kitchen Perfect Chocolate Chip Cookies)
Makes 2 dozen small cookies 

Ingredients

1 3/4 cups flour 
1/2 teaspoon baking soda 
14 tablespoons unsalted butter
1/2 cup granulated sugar
3/4 cup dark brown sugar (best choice) or light brown sugar
1 teaspoon salt
2 teaspoons vanilla
1 large egg
1 large egg yolk
1 1/4 cups semisweet chocolate chips 
3/4 cup chopped pecans or walnuts, toasted (optional) 

Directions

Preheat oven to 375 degrees. 
Line 2 baking sheets with parchment paper. 
Whisk together flour and soda in medium bowl. 
Heat a medium pan over medium high heat and add 10 tablespoons butter (don't use a nonstick pan). Constantly stir until it gives off a nutty aroma and is golden brown. If you do not brown it enough you will get flat cookies. But don't burn the butter either. It can go from browned to burned quickly. 
Pour into a heat proof bowl (I use my KitchenAid but it's not necessary) and add remaing 4 tablespoons butter. 
Allow to melt. 
Add sugars, salt, and vanilla  and mix well.
Add egg and yolk and whisk on hight (very vigorously if not using a mixer) for 30 seconds and then let it sit for 3 minutes. Repeat whisking and sitting 3 times. It should become very light and fluffy 
Stir in flour and baking soda.
Add chocolate chips. 
Scoop 12 large tablespoon portions onto each pan. I think my scoop is #70 but I slightly over fill it. 
Bake for about 10 minutes or until edges have become light brown and middle is still a bit soft. 
Transfer to a wire rack to cool. 
I like them cooled completely so you can taste the complexity of the cookie. Yummmm

Friday, June 20, 2014

cherry pie // mollie


I grew up in a pie-eating family. My Grandma McKown, my Dad's mom, was an excellent pie maker. She is a southern girl and knew how to make meringue pies and pecan pie and all the fruit pies ever. But oh, her Chocolate Cream pie was my favorite. Then, there is my own amazing mother. She is somewhat of a perfectionist when it comes to, well, everything she makes. Pies are no exception. Her pecan is to die for, and apple! and pumpkin! She cans her own pumpkin. I'm not one to forget about the few family traditions we have had throughout the years. So I decided to be a pie maker too. I've made pies throughout my years of being on my own and I really love doing it. I'm not a perfectionist in any way. With anything that I do. I wish I was more of one, but I'm not. I just thoroughly enjoy making a pie in the kitchen with my girls playing on the ground in my sight. (Or crying at my feet, whichever).

Cherry Pie. I want to say that I know that some people don't like Cherry Pie. But that is because they never had my Mom's cherry pie. I think out of all of her pies, it is my favorite. Because not only does she make the cherry filling from scratch (never use that canned filling with the hot pink syrup, EW!) but she makes them so beautiful! When I make them they are not as beautiful, they are funny looking, but many people have said they were yummy. And that is what I'm going for here by the way.


Martha Stewart Perfect Pie Crust:

Ingredients:


1 1/4 cups all-purpose flour (spooned and leveled), plus more for rolling dough
1/2 teaspoon salt
1/2 teaspoon sugar
8 tablespoons (1 stick) cold unsalted butter, cut into pieces
2 tablespoons ice water, plus 2 more, if needed

Directions:
-In a food processor, pulse flour, salt, and sugar several times to combine. Add butter. Pulse until mixture resembles coarse meal, with just a few pea-size pieces remaining.
-Sprinkle with 2 tablespoons ice water. Pulse until dough is crumbly but holds together when squeezed with fingers (if needed, add up to 2 tablespoons more ice water, 1 tablespoon at a time). Do not overprocess.
-Turn dough out onto a work surface; form dough into a 3/4-inch-thick disk. Wrap tightly in plastic, and refrigerate until firm, at least 1 hour.
-Before baking, unwrap dough; place on a large piece of floured waxed paper. Roll dough to a 14-inch round. Using paper, lift and wrap dough around rolling pin (discarding paper); carefully unroll over a 9-inch pie plate. Gently fit into bottom and up sides of plate.
-Trim overhang to 1 inch; fold overhang under itself. Pinch between thumb and forefinger to make a uniform edge around the rim. Crimp edge; refrigerate until chilled, about 1 hour.

Cherry Filling

Ingredients: 

3 cups Red Tart Cherries in Water(Drained)
1 1/3 cup sugar
3 Tbsp. flour
1 tsp. almond flavoring

Directions: 

-Put cherries in a bowl with sugar and mix. Let sit while pie crust is chilling
-When crust is ready pour off half of the juice from the cherries
-Add flour and mix slightly
-Pour in crust and sprinkle almond flavor on top of cherries.
-Add top crust (design how you like)*
-Bake at 450 degrees for 40-50 mins*

*i did a criss cross top for my crust this time... like i said, funny looking. but its fun to try out different tops. make sure you dab butter and sprinkle sugar on top before baking.
*you might want to add some foil to the edges so it doesn't burn before the center is done baking.

Friday, June 6, 2014

Barbecue Chicken Wrap with Swiss Cheese and Grilled Onions


I don't know if this is so much a recipe as it is a recommendation of flavors put together haha. I highly recommend it :) either as a sandwich, wrap, or a flatbread type wrap I like to make (seen above). I guess it's kind of like a pita.  Summer in a sandwich. 

It was blazing hot today but we stilled got out in the heat to grill. Well, my husband did... (Yay). I stayed inside and got everything else together. The thermostat, that I'm positive isn't accurate, said it was about 109 degrees on our patio. The misters my husband installed on our pergola for me were on twice today. So glad we have them. If you live in the desert and are outside in the summer I highly recommend installing some. That's two things I recommend today. This chicken and mist on the patio in the summer. 

Barbecue Chicken Wrap with Swiss Cheese and Grilled Onions 

Serves 4-5

Ingredients

3 chicken breast, salt and peppered
1/2 - 1 cup barbecue sauce
1 cup grated Swiss cheese
1/2 onion, sliced in rings
1 tsp olive oil
Tortilla wraps, pita bread, or flat bread

Toppings
4 cups chopped lettuce
3 cups chopped cucumber
1 cup sliced olives
Ranch dressing or mayonnaise 


Directions

Preheat the grill to 350-400 degrees.
Set burners to medium. 
Put onion in a plastic bag with oil and shake. Remove from bag onto grill in a grill basket. Or if you don't have a grill basket carefully place onions directly on grill. 
Place chicken on the grill and spoon one spoonful of BBQ sauce over the top. 
Close lid and cook 7 minutes.
Open and flip onions. If they are getting too charred remove or continue to grill with chicken. 
Flip chicken and spoon more BBQ sauce on the top. 
Sprinkle enough Swiss cheese on the chicken to just cover it.
Close lid and cook for another 7 minutes.
Remove chicken and onions.
Let chicken rest for 5 minutes
Slice chicken and build wraps.


Tuesday, June 3, 2014

Asparagus and Pea Pasta Salad with Lemon Basil Vinaigrette


With the 100 degree temperatures I need something cool for dinner. The vinaigrette turned out to be delicious with the pasta, and bread used to wipe my plate. The peas were a great sweet accent to the tart lemon. If you were to make dinner in less than 100 degree weather I'd say grill up some chicken to serve with it. But I'm too chicken for that right now. Or just too darn lazy :) This is what I call a happy summer meal. 

Asparagus and Pea Pasta Salad with Lemon Basil Vinaigrette 

Serves 4-5 as a main course

Ingredients

1 lb pasta such as rigatoni or penne
1 bunch asparagus, sliced
1 small head romain lettuce, chopped
1 1/2 cup frozen petite peas, thawed

Vinaigrette 
Juice and zest of 2 lemons 
4 tablespoons olive oil
4 tablespoons canola oil
1/4 cup finely chopped fresh basil
1/2 teaspoon minced roasted garlic
1 heaping teaspoon sugar
1/2 teaspoon salt plus more to taste
Pinch of fresh ground black pepper plus more to taste

Directions

Mix together all vinaigrette ingredients in a jar with a lid. Shake well. 
Bring a pot of salted water to a boil, add the asparagus. 
Bring water back to a boil and allow to boil for about 30 seconds more temove from heat.
While keeping the water in the pot, remove asparagus to a colander and rinse with cold water. 
Bring the water back to a boil and add pasta and cook according to package instructions to al dente.
Put pasta, asparagus, and peas in a large bowl.
Pour half the vinaigrette over it and stir.
Refrigerate. 
Add lettuce and remainder of vinaigrette just before serving. 
Serve with chicken, fish, or just a little Parmesan. 

Monday, June 2, 2014

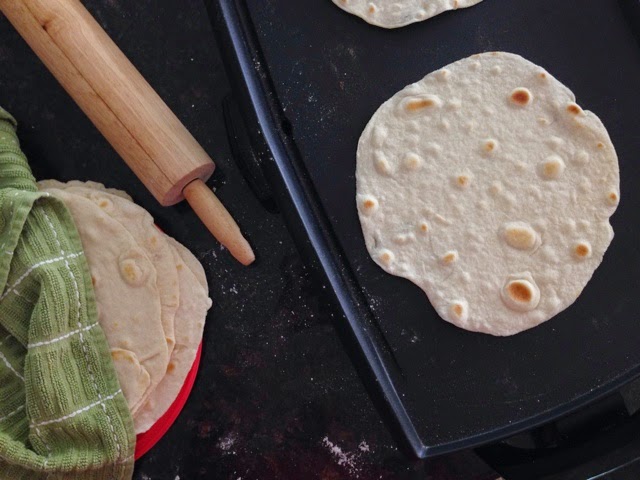
Tortillas


I love my griddle. I received it as a wedding gift from a friend 6 years ago and have used it close to every other week since then, if not more. And I think of her whenever I use it. Thanks Jen :)

I'm taking some enchiladas to a family in our neighborhood tonight and I should not have made these. I want to eat them right now. They might not get dinner tonight ;) 

I found this recipe via Pinterest on Annie's Eats  so go check her blog out. I've tried other tortilla recipes but for some reason they just weren't that good. These are good and easy! I used my food processor but a pastry cutter or even a fork will work to cut the fat into the flour. Today, they probably took me 30 minutes at the most. My 3 year old loved watching the dough spin in the food processor. Then, after I divided the dough, I helped him off to his nap while the dough rested. I then came back to roll out and cook them. Simple :) and so worth it. 

Tortillas adapted from Annie's Eats
Makes 12, 8-9 inch tortillas

Ingredients 

3 cups flour 
2 teaspoons baking powder
1 teaspoon salt
5 Tablespoons unsalted butter (or shortening) 
3/4-1 cup cold water

Directions 

Place flour, baking powder, salt and butter into a food processor and pulse about 5 times (with dough blade and dough button pressed) until it is mixed like sand. 
Turn on the processor and slowly stream in the water. Mix until the dough is in one large ball. If it's too wet add just a tablespoon of flour at a time.
Remove from bowl and divide into 12 equal pieces.
Let it rest covered with a clean kitchen towel for 10 minites.
Heat griddle to 325 degrees or pan to medium heat. 
Roll out dough balls on well flour surface to about a 8-9 inch circle. 
Cook on one side until lots of small bubbles form and flip. Maybe 30 seconds or so.
Finish cooking the other side until it's lightly browned. Maybe 30 seconds to a minute. Not too long or they will be too crispy to fold. Just keep an eye on them and you'll be good to go. 
Put them in a plate and cover with a clean towel. 
They also freeze well. 

Yum